How To Starting A WordPress Blog With BlueHost 2027 – Guide
Starting A WordPress Blog With BlueHost 2027:
Today you will learn best way to starting a wordpress blog with bluehost within 10 minutes or less.
To start your own website/blog 2027 you need to purchase two things: Domain and Web hosting. Think of domain name as your house address and webhosting as your house. Webhosting is the place where all the files (Images, CSS, coding) of your website will be placed, and when users type your domain name, they will be accessing those files from your web-server to their browser in the form of website.
In this particular example, I’ll use BlueHost for the hosting and show you how to set it up. It’s cheap and works well.
Good for people on a tight budget. Here you will learn from start a wordpress blog thus get free domain name with bluehost and steps yo buy hosting.
Use Four Simple Steps When Starting My Own WordPress Blog With BlueHost:
This is very straightforward and I work off these steps when starting a blog with bluehost. Don’t use free hosting, always get your own domain and hosting.
- Find hosting & a good domain name
- Create the site and customize it
- Fill it with good content that’s keyword optimized
- Promote
You will need to buy some hosting to host your website online. Luckily, I managed to get a great deal for you and a free domain name!
The domain is going to be the name of your website if you don’t have one already.
To receive the best deal right now you can get my special deal here that’s going to be free domain, free ssl.
To start with click here & go to Bluehost site and click on get started now.
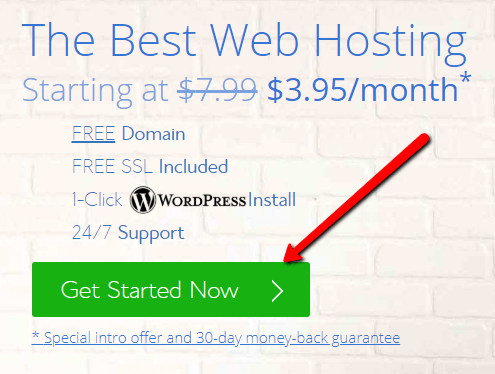
This will take you to a page where you will see three different packages to choose from.
Choosing The Right BlueHost Plans And Domain:
I would suggest going with the $3.95 plan with a shared hosting as a new beginner. This is the more affordable plan online today!
BlueHost can do free migrations if you aren’t happy with your current host or looking for a change. The other plans do come with marketing extras. However, I don’t use them so I just go with the basic plan.
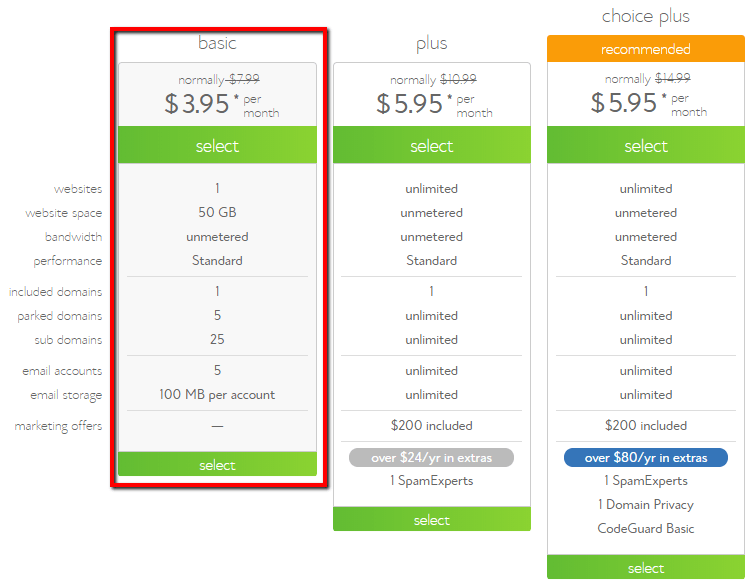
Click on select in front of the plan you have selected.
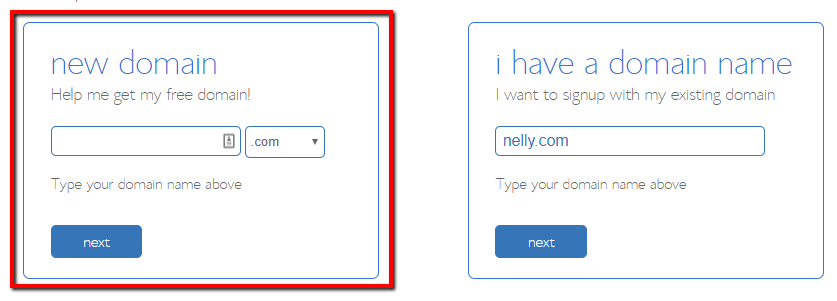
Pick free Domain or use your existing domain name:
Next page is where you can either get a free domain name from Bluehost or you can use any of your existing domain name.
Choosing the domain name can be a challenge.
Think about the domain name for a while because you can’t change it once you’re on the other side.
If you’re doing a blog that’s going to be very active and you want to build awesome amounts of traffic to it then make it brandable. Something weird or something people will remember.
BlueHost will take you to the domain section after you have chosen a plan. If you already have a domain name then you can transfer it quick and easy.
Check Your Domain Name Availability Below:
Even if you don’t use free domain feature right now, you can always get your free domain later.
Note: If you are using your existing domain name from some other domain registrar such as Godaddy,Namesilo you need to change your domain Name-server to
NS1.Bluehost.com
NS2.Bluehost.com
If you want to keep things simple, better enter the domain name you wish to buy in “new domain” field and your free domain will be activated with your hosting purchase.
Once you have done all that you will be asked to put in your details and payment details.
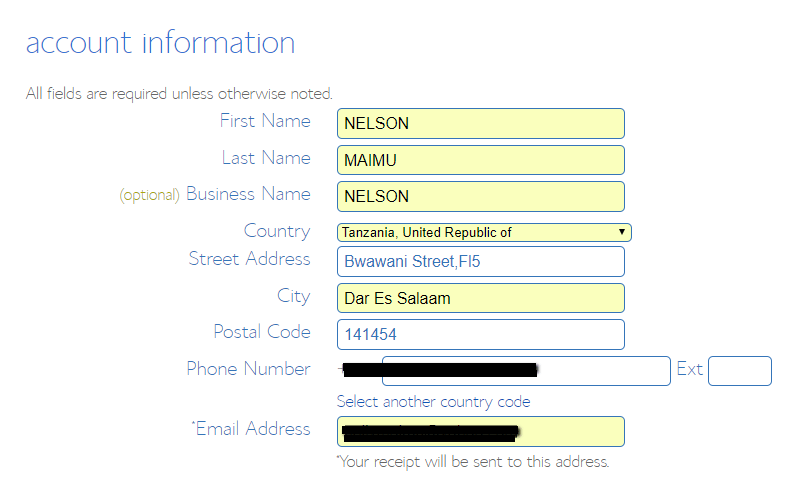
In this section you need to enter your details (Name, email address, address), which is straightforward, and make sure you verify every details (Especially email address), as you will get your login and hosting information in your email address.
Note: Above details are dummy details for reference only!
BlueHost Package Information:
This part is crucial and you should pay extra attention to ensure you are not over-charged for add-ons that you don’t even need.
Pick hosting package for 24 or 36 months term, as you will notice the price decreases as tenure increases.
Once you’ve done that the next page will give you some options, The only one I go with is domain privacy. It’s not needed though I just like to use it.
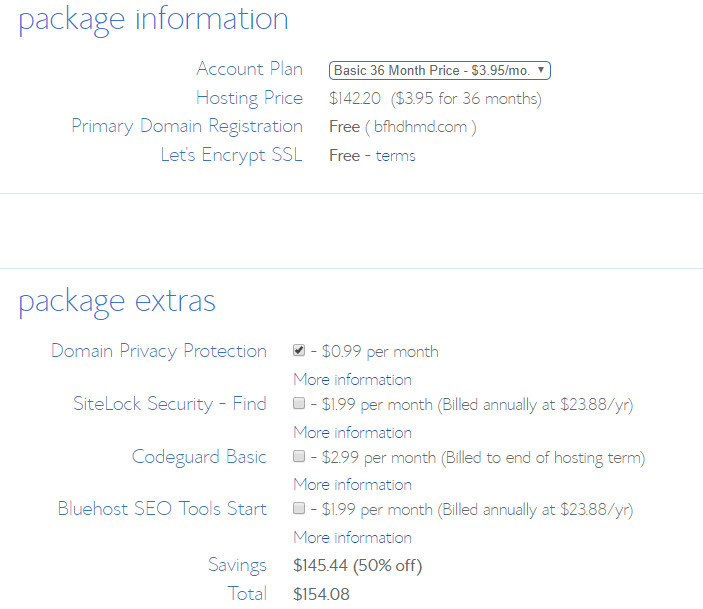
Also make sure you deselect the option “Sitelock Security-Find” “Codeguard Basic”, as you don’t really need them.
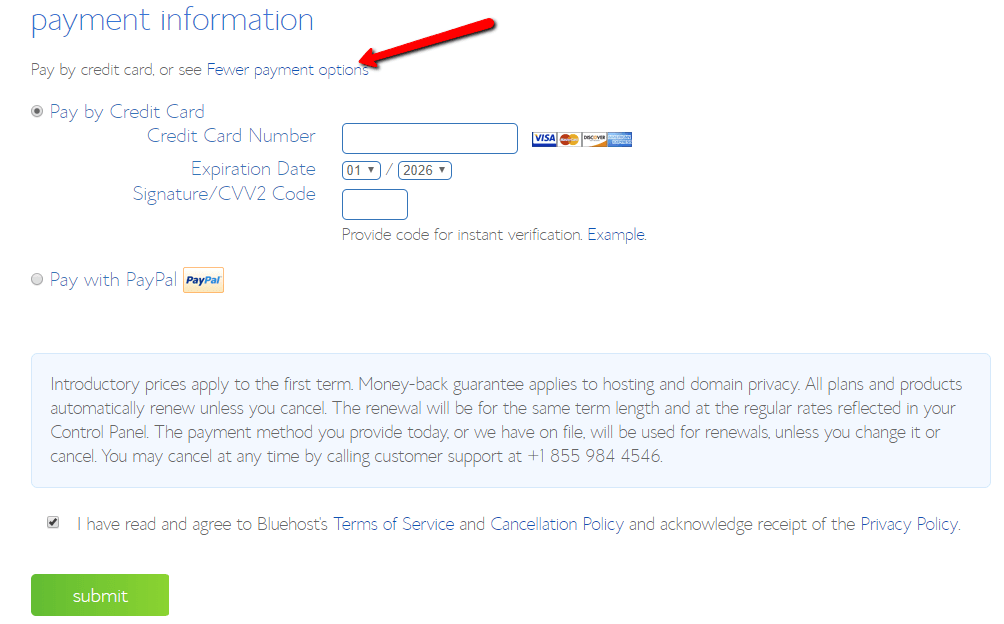
Before you make the payment, I suggest you to scroll up and verify all the information. By default you will see the option to make payment via Credit card only, but if you want to make payment via PayPal, click on “More payment option” and it will show you Pay by PayPal option too.
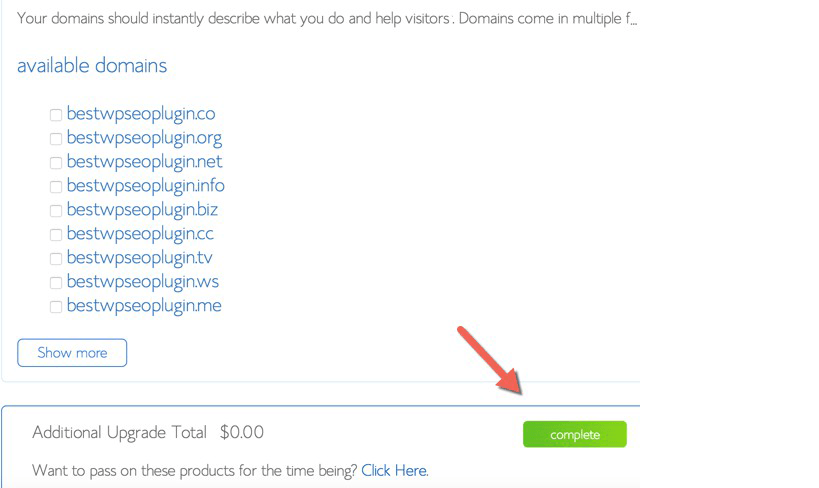
Use the payment option you are comfortable with, and after making payment you will see another after sale page like this.
(Just ignore everything), click on complete at the end.
On the next page you will get the confirmation for your hosting purchase and you will see a screen like below. Click on “create your password”:
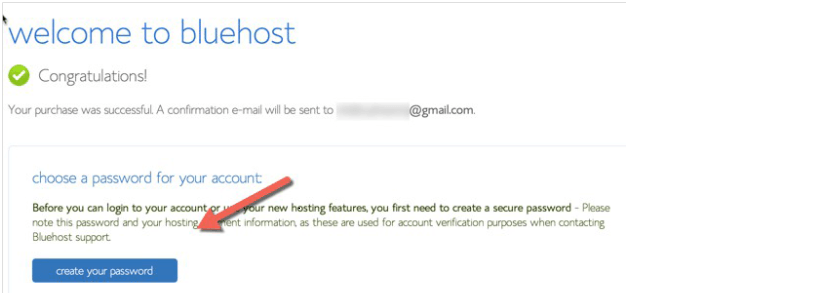
Selecting the password:
This is the last stage of your web hosting purchase, as you just need to set the password for your hosting login. You can use any of your password or you can use password generator to create a complex password.(Recommended).
Copy and paste the password at any safe place and click on paste. Click on create and that’s it, now you are 98% done buying your web hosting for your blog
That’s it you are done with all the steps to buy your web hosting and domain name.
So that’s quite simple, right? Just follow the instructions and you’re on your way to starting a great wordpress blog with bluehost.
I don’t want to complicate things because it’s very easy to do this. I could go on about options and pricing but there is no reason for that. Blue Host is good cheap hosting and that’s all you need if you’re on a budget. Now you’re ready to starting your wordpress blog with bluehost.(Install wordpress)
Do you want me to setup wordpress for you?
CLICK HERE TO LEARN HOW I CAN HELP YOU TO SETUP YOUR BLOG.
Learn How To Install WordPress On BlueHost Hosting And A Few Basic Settings:
What is WordPress?
WordPress is the world’s most popular platform for building a website. WordPress is a content management system, or CMS for short, which means that while you provide all the content that makes up your site (such as images, text, videos, etc.), the platform does all the coding and organizing for you — so you don’t have to be experienced to build a beautiful, functional website.
Steps To Install WordPress Into BlueHost:
This step is very easy with a few clicks of a button to get starting build your wordpress blog with bluehost.
Bluehost will install WordPress for you!
Login to your Bluehost account and Click on hosting at the top, to go inside cPanel.
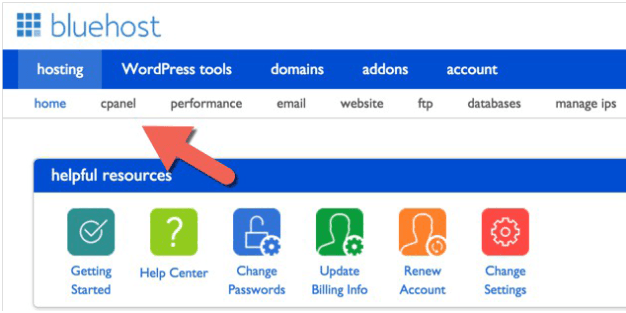
Scroll down to Website Builders> Select WordPress from the list, and it will take you to the next page.

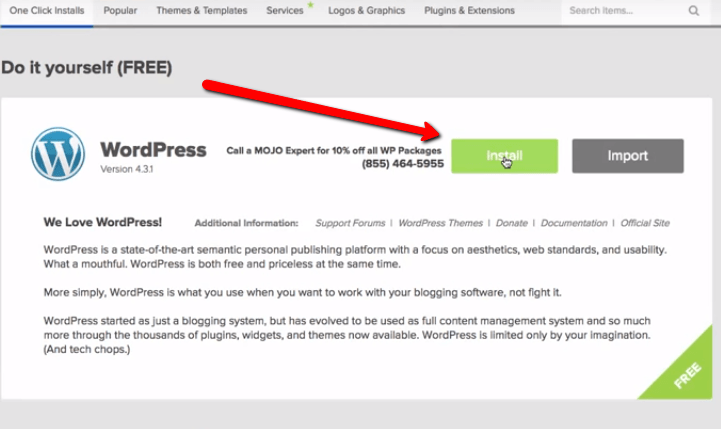
On the next screen click on Install in-front of WordPress installation pop-up.This will lead you to next page where you can make many changes.
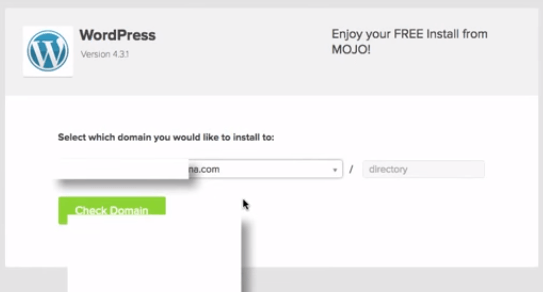
On the next page click select the domain on which you want to install WordPress. So this is the time you starting your wordpress blog with bluehost.
Then, Select “Show advanced option” for you to setup your wordpress login details includes Site name, admin username and password.
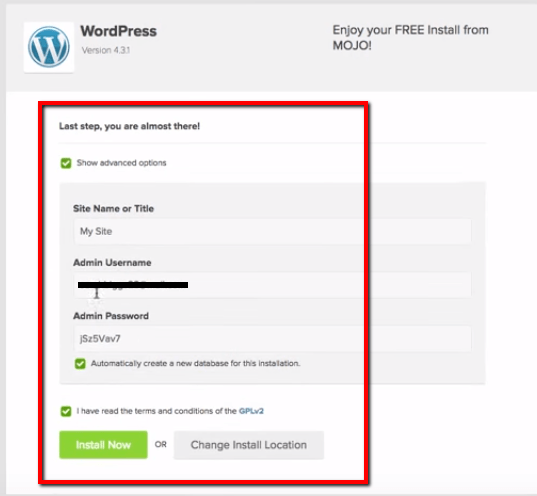
Click “Install Now” Email will be sent to the registered Email address about the login and password which you can use to login to your WordPress dashboard.
That’s it and now your WordPress blog is up & running.
You can login to your WordPress dashboard every-time by going to http://domain.com/wp-admin (replace domain with actual domain name).
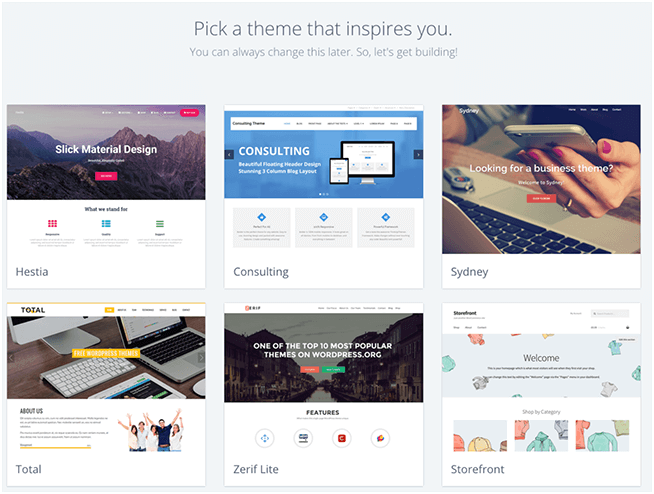
Now you choose a theme for your website.
Don’t worry you can change this later if you need to change it. You can skip certain settings, depending upon your requirement.
Once you have done that it’s all done!
You will be taken to a screen that says “Start Building” Click that button.
You will end up here.
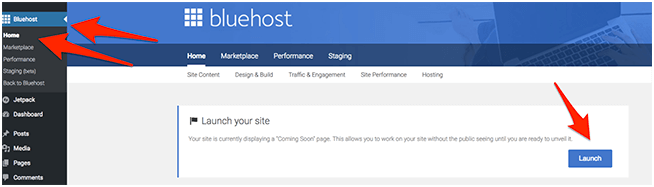
Now we just need to launch the website.
Follow the instructions in the picture below by clicking “BlueHost” then “Home” Then “Launch”.
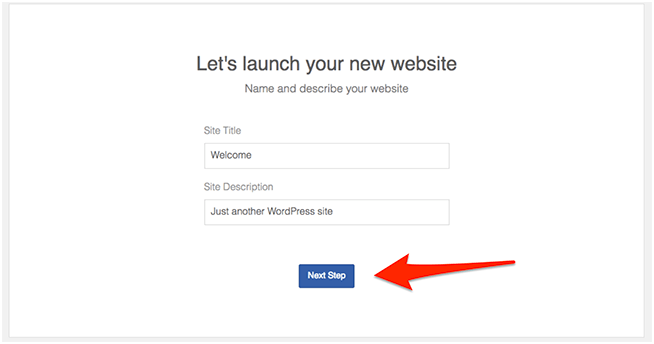
Now all you need to do is name the blog and click “Next Step”
Congratulations! You have just created an amazing website where you can now start blogging!
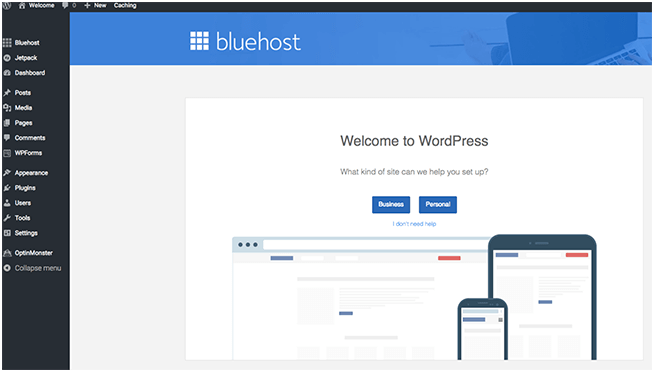
Once this is done you will be taken to the backend that will look like this.
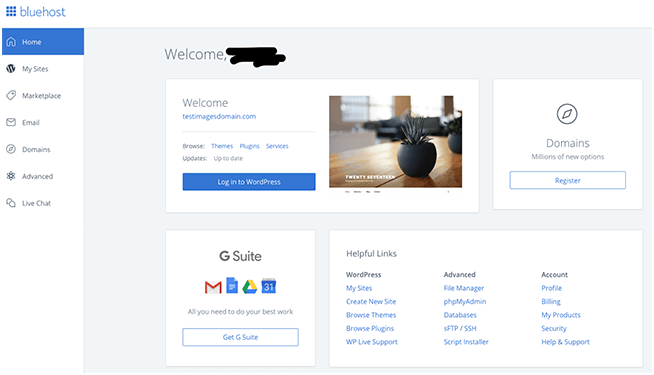
This is where you can do things like Live Chat and some other options as you can see from the image above.
I love using BlueHost because they have the automatic wordpress install.
Other hosting providers make you install it yourself and it can be time consuming and confusing.
Now that you have the blog setup it’s time to grow it!
So, let’s get started with our WordPress setup guide dashboard and learn how to set up WordPress blog.
You can login to your WordPress dashboard every-time by going to http://domain.com/wp-admin (replace domain with actual domain name).
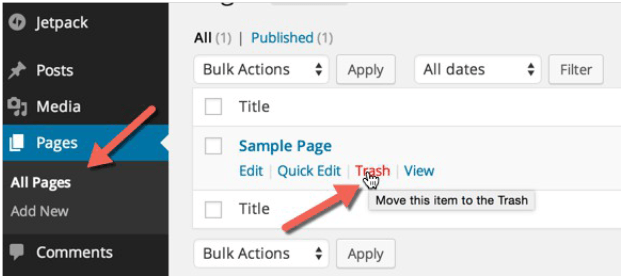
Delete default Posts and page:
Login to your WordPress dashboard and go to Posts> All posts and delete the default “Hello world” post. Similarly go to Pages > All pages and delete the default “Sample page”.
Set up WordPress permalink:
The default WordPress permalink is like http://yourdomain.com/p=123. This permalink is short but not friendly for search engine. We need to change it to make it search engine friendly. Go to settings > Permalink and select the post name and click on save. This ensure that your permalink when appear in search engine, it will contain some keywords and your blog posts will rank better in search engine.
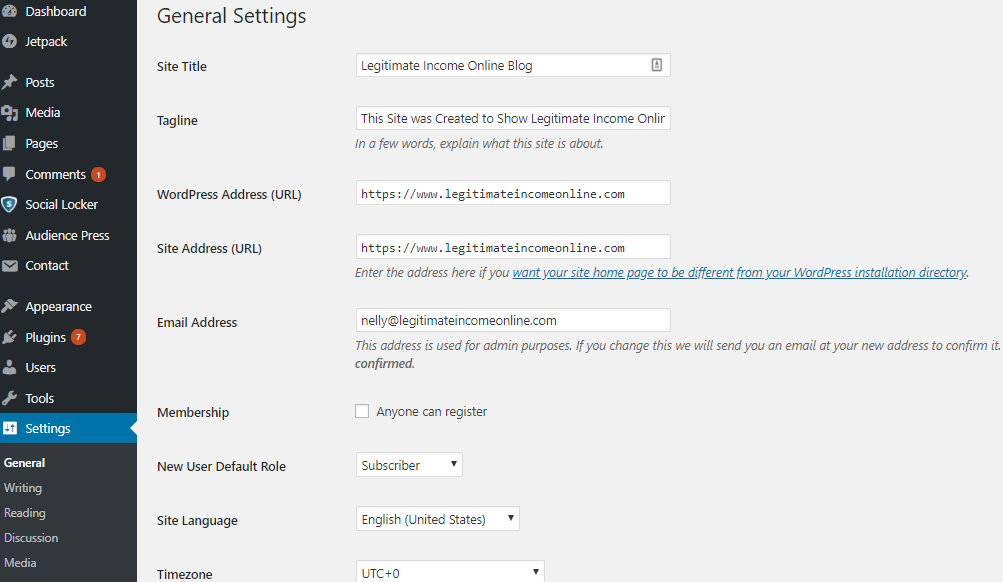
Settings > General:
This is where you will configure your Homepage name and tag line. This is very important, as by default this is what shows up in Google search. Email address will be your site admin Email address and this is where you will get all the email notifications related to your site. Make sure you setup the time zone to your local time, this will make sure your scheduled post will go according to your time zone.
Settings > Writing:
At this stage, we will set up WordPress settings related to writing. By default, WordPress adds a category “Uncategorized” which doesn’t look so ideal. Here you can change the default category to any other category. You can go to posts> Categories from left sidepanel, and add a new category. Come back, and change the WordPress default category to newly created category.
WordPress ping list:
One of the major difference between a static Website and a blog is ability to ping. By pinging search engine bots, our WordPress blog notifies the search engines about newly published blog post. You should update your ping list with all major ping services. You can get a list of updated WordPress ping services from here. Add all the ping services URL and click on update button.
Settings> Reading:
Here you can configure number of maximum blog posts to show on homepage and in feeds. Also, you can set if you want to publish full content or just partial content in the feed, I prefer to offer partial feeds (Summary) , as I want more activity to happen on my site and also to avoid RSS theft.
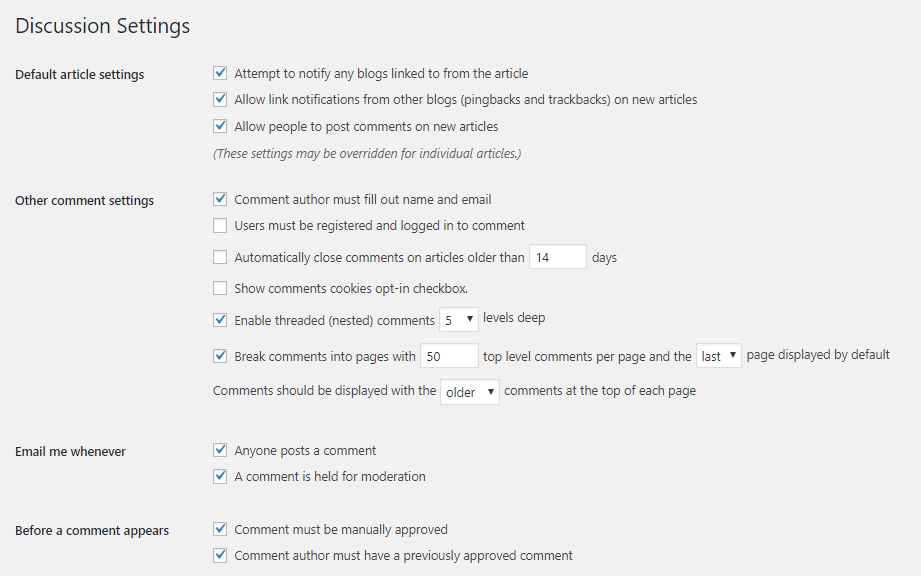
WordPress discussion/comment settings:
This is another section, which you should setup just after installing WordPress. Just follow the screenshot and put check mark in front of the field as shown in the below screenshot.
Avatar settings:
Now, if you are new to WordPress, I suggest you to go to Gravatar.com and create an account and upload your image for your Email address. This way your image will show on WordPress or any other WordPress powered sites where you will be commenting or guest posting.
Settings > Media
Though, you can skip setting up this part but I usually suggest users to make some necessary changes to avoid lots of image files. By default, when you upload images in WordPress, it creates images in 3 different sizes. Here you can set sizes as 0*0 and keep only one desired size as enabled along with size.
With all these changes, you are done with set up of WordPress blog. Now, we need to make more changes like add plugins, submit sitemap, Install theme, and customize look and usability of our blog.
Now it’s time for you to go and starting build your wordpress blog quickly with bluehost.
>>>>>>>START BUILDING YOUR BLOG HERE WITH BLUEHOST<<<<<<<
[thrive_leads id=’1953′]
Thank you for take a time to read a simple steps to starting your wordpress blog with bluehost. Don’t forget to sharing with others who are interesting to starting either their own wordpress blog either personal blog or business.
Learn More about web hosting simple introduction:
Read Previously post top 3 cpa networks with highest paying rate
Disclosure of Affiliate Links:
Some of the links in this blog post are affiliate links. This meaning I may receive a commission if you click on the link and make a purchase. However, that does not increase the cost to you, and I only recommend products or services I trust and have personal experience with them.


Pingback: Bluehost Hosting Review - Wordpress Hosting Review (Pros and Cons)
Pingback: Bluehost Hosting Review – WordPress Hosting Review (Pros and Cons) – Nelson Maimu Review Blog
Thank you
You’re Welcome Jose.
I would to try this ! Okay ! Thank you!
Noted! Thank for dropping by.
Thank you very much. I truly appreciate it
wow the great and thanks
Very Good network
Very good network .
Nicely done explained in great detail. Very nice